On this page
Quick answer: Greenhouse condensation forms when moist air touches glazing, framing, leaves, or equipment that has cooled to the air’s dew point. Start by noting where water appears and when it begins. Then reduce avoidable moisture before night, correct cold stagnant pockets, and use ventilation only when the incoming air can help carry moisture away.
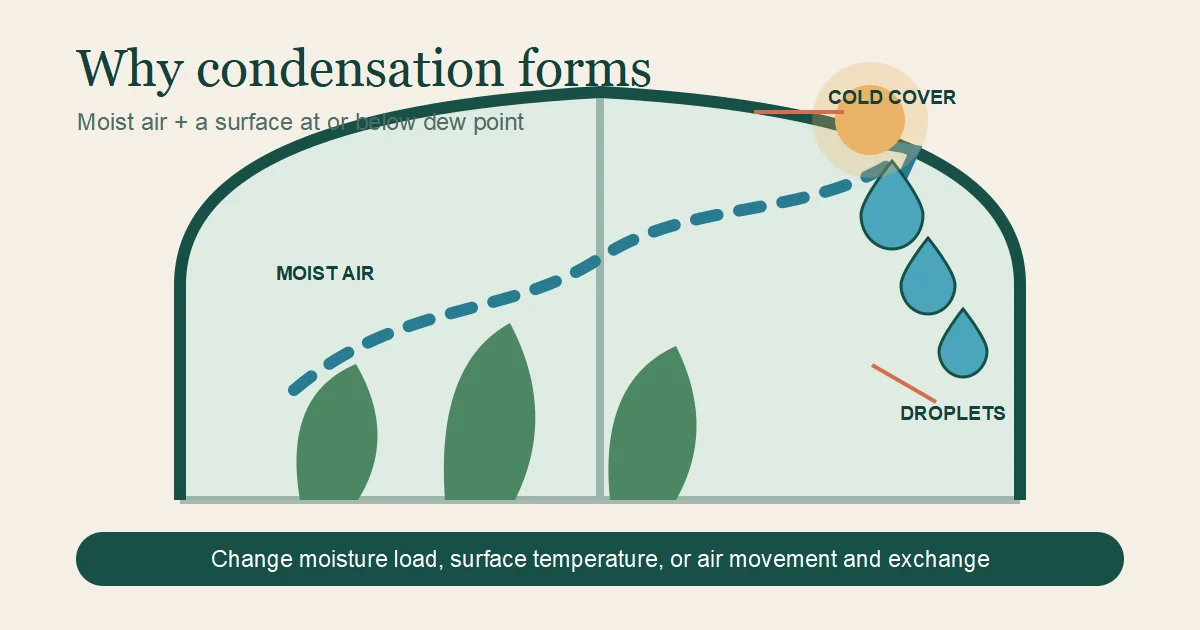
Wiping droplets treats the evidence, not the cause. A useful fix must change at least one part of the condensation chain: the amount of water vapor in the air, the temperature of the vulnerable surface, or the movement and exchange of air around that surface.
Why greenhouse condensation appears overnight
Warm air can hold more water vapor than cool air. As the greenhouse and its cover lose heat after sunset, nearby air cools. When a surface reaches the dew point—the temperature at which that air can no longer keep all its water vapor in gas form—liquid water forms on the surface. UMass Amherst Extension describes this same temperature, moisture, and dew-point relationship in its guidance on reducing greenhouse humidity.
This explains why the first wet area may be a cold panel, metal frame, north wall, leaf edge, or corner rather than the location nearest your humidity sensor. Surface temperature matters, not air temperature alone.
Use location and timing as diagnostic clues
Condensation is not evenly distributed unless temperature, moisture, and airflow are also even. Treat the wet pattern as a map. One observation does not prove a cause, but repeated patterns narrow the next check.
| What becomes wet first | Likely mechanism to investigate | Next check |
|---|---|---|
| Roof or glazing across most of the house | Large cold surface reaches dew point while the whole air mass remains moist | Record dusk watering, floor wetness, inside temperature trend, and outdoor conditions |
| One corner, north wall, or area behind dense plants | Cold or stagnant pocket | Compare temperature and air movement with the open crop zone |
| Leaves before nearby glazing | Leaf surfaces may be cooler than surrounding air or surrounded by a humid boundary layer | Check spacing, canopy density, circulation path, and whether leaves entered night wet |
| Below framing joints, gutters, or recurring drip lines | Condensate is collecting and moving from a colder surface | Trace water upward before assuming a roof leak or irrigation fault |
| Only after irrigation or on persistently wet days | Moisture input may exceed useful removal | Review irrigation timing, drainage, standing water, and whether ventilation can dry under current outdoor conditions |
Run a night-to-morning condensation check
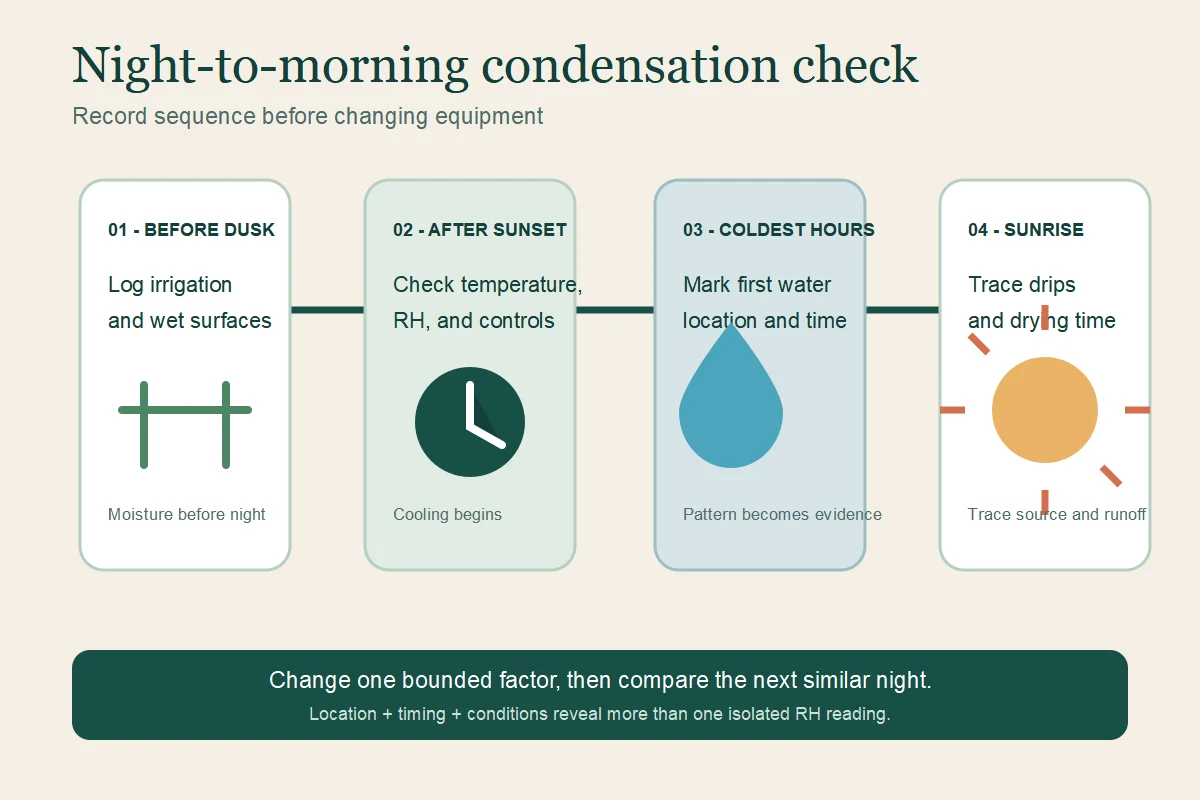
Use one representative night and repeat the check before making several changes at once. A small log is more useful than a single peak RH reading because it connects moisture inputs, cooling, equipment state, and the first visible water.
- Before dusk: note irrigation finish time, wet floors or benches, standing water, open vents, heater settings, and circulation-fan status.
- After sunset: record inside and outside temperature and RH if available. Inspect the cover, framing, corners, and dense canopy without changing controls.
- When condensation begins: record the first wet location and time. Check whether circulation reaches that area; do not use smoke, flame, or improvised electrical tests.
- At sunrise: distinguish water that formed locally from water that ran or dripped from above. Note how long leaves and surfaces remain wet.
- Change one bounded factor: for example, finish appropriate irrigation earlier, remove standing water, correct a blocked air path, or adjust an existing control within its instructions. Compare the next similar night.
A log cannot calculate dew point at every surface unless you measure surface temperatures, but it can show which event comes first. That sequence prevents random equipment changes.
Fix greenhouse condensation in the right order
1. Reduce avoidable moisture entering the night
Water plants according to crop and media needs, but avoid carrying unnecessary free water into the cooling period. UMass and University of Alaska Extension guidance both emphasize earlier watering, drainage, dry floors, and removal of standing water as practical humidity controls. Check leaking lines, saturated walkways, uncovered water, and runoff that cannot drain.
Do not solve condensation by withholding water a crop needs. The target is avoidable evaporation and standing water, not arbitrary dryness.
2. Remove cold, stagnant pockets
Horizontal airflow and other circulation patterns can distribute heat and reduce local pockets where surfaces cool and humid air lingers. WSU Extension notes that plant surfaces can be cooler than surrounding air and describes horizontal airflow as a way to support more uniform conditions. Check whether foliage, stored materials, curtains, or benches block the intended path.
Circulation and exhaust are different jobs. A circulation fan moves air inside the greenhouse; it does not remove net water vapor from a closed structure. Use the circulation fan versus exhaust fan guide if those roles are unclear.
3. Keep vulnerable surfaces from crossing dew point
Where heating is already part of the greenhouse system, even heat distribution can reduce very cold surfaces and increase the air’s moisture-holding capacity. This does not destroy water vapor. If moisture remains trapped, warming alone may delay condensation or move it to another surface.
Follow heater instructions. Fuel-burning equipment, wiring, controls, and permanent modifications require appropriate clearances, ventilation, and qualified help where applicable.
4. Exchange moist air when outside conditions help
Ventilation can replace moist greenhouse air with outside air, but “outside RH is high” does not automatically mean outside air cannot dry the greenhouse. Temperature changes the meaning of RH. Compare conditions, heating cost, and the greenhouse’s ability to move replacement air through a complete path.
Short heat-and-vent strategies appear in Extension guidance because warming and exchange can work together under suitable conditions. They are not a universal timer setting. A poorly sized or restricted intake can also reduce delivered exhaust flow; see the intake vent sizing guide before assuming the exhaust fan alone is the problem.
Why common fixes fail
| Attempt | Why it may fail | Better use |
|---|---|---|
| Wipe the glazing | Removes liquid after formation but does not change moisture, surface temperature, or airflow | Use cleanup to prevent dripping while diagnosing source |
| Add a larger circulation fan | More air speed may leave dead zones and still removes no net moisture | Verify a gentle, complete circulation path before changing equipment |
| Open every vent overnight | May cause excessive heat loss, cold surfaces, or little drying when outdoor conditions are unfavorable | Use controlled exchange based on conditions and system capacity |
| Raise heat only | Changes RH and surface temperature but leaves water vapor inside | Pair appropriate warming with source control and useful exchange |
| Chase one RH number | A representative air reading may miss colder surfaces and local pockets | Log temperature, RH, location, timing, and equipment state together |
When condensation signals a wider humidity problem
If condensation appears across many surfaces, persists through the day, or returns despite correcting obvious water and airflow problems, step back from the drip location. Review the full moisture system: irrigation, plant load, drainage, temperature, outdoor air, ventilation, circulation, and controls. The greenhouse humidity control guide provides that wider control loop.
Also inspect for plumbing leaks, roof leaks, blocked drains, failed controls, unsafe heaters, or electrical exposure. Condensation can resemble or worsen other faults; do not assume every recurring wet spot is normal greenhouse moisture.
A practical next step
Tonight, record the moisture inputs before dusk and mark the first surface that becomes wet. Tomorrow, change one supported factor and compare the next similar event. If the wet pattern moves or starts later, that is useful diagnostic evidence. If nothing changes, inspect the next link in the system rather than buying equipment at random. For system context, start with the greenhouse ventilation guide.
Sources and methodology
This article synthesizes university Extension and university greenhouse guidance into a location-and-timing troubleshooting method. The clue map, inspection sequence, and failure-mode table are editorial tools derived from dew-point, moisture-source, circulation, heating, and ventilation principles. No original greenhouse measurement, installation, equipment test, owner case, crop trial, or disease evaluation supports this article.
- UMass Amherst Extension: Reducing Humidity in the Greenhouse
- Washington State University Extension: Greenhouse Construction and Management
- University of Arkansas: Atmospheres—Humidity
- University of Alaska Fairbanks Cooperative Extension: Controlling the Greenhouse Environment
- UF/IFAS Extension: Greenhouse Ventilation